Friday, December 23, 2016

tinkered holiday round-up


Over the years I've had the pleasure of contributing holiday tutorials to Romantic Homes and their Vintage Holiday special issue publications. It's always an absolute treat to see how the words and images I send to them are transformed by their talented team of designers and editors into beautifully designed glossy pages on the newsstand!

By looking at the first pages of each project below you can probably guess how to make them; if you need assistance, just visit me at my tinkeredtreasures page on Facebook and I'm happy to help! All images are click-to-enlarge.


My first holiday "Make It" was Boxing Day where small matchboxes (a favorite project of mine) are decorated with scrapbook paper and printed-and-punched words. This is still one of my all-time favorite features!


Next came New Birds on the Block where birdhouses from the wood craft aisle are fashioned to resemble vintage style putz houses, originally made from paper.


Just Add Salt was a superspecial feature because the mischievous elf landed a spot on the cover!


Yup! There he is in the far-right bubble!


And from this holiday season, Festive Charmers!

In assembling this post I realize that I've done about two dozen tutorials for the Romantic Homes family of magazines! Special thanks to Jacqueline deMontravel, Meryl Schoenbaum, Staci Dumoski, Devlin Smith, Jickie Torres, Elena Oh, and so many more!

Thanks as always for visiting! Wishing you all the best health and happiness this holiday season and beyond!

xo
elyse

Sunday, December 4, 2016

clipping catalogs


I actually enjoy receiving piles of catalogs in the mail around Christmastime. Dog-earring glossy pages showcasing petit fours or party dresses, but I'm especially drawn to classic winter gear. With sub-freezing temps right around the corner, my head is easily turned by rich plaids, snowflakes and cable knit.


I decided to get snippy with my stack of catalogs and make a garland/bunting to infuse these festive patterns and colors into my seasonal decor on the cheap! First I created a template using card stock but this step can be skipped.


Fold magazine page in half, crease well and make two snips away from the fold, creating a triangle. Keep cutting folded triangles until you have enough to fill a length of baker's twine or string. If this doesn't make sense, check out this video.


Place each folded triangle over the twine, give a few light swipes of glue stick (leaving space at the crease to re-position along the line as needed), press together and align well, and smooth flat.


I like to attempt a random pattern by simply grabbing each triangle without studying it first.


This doesn't take long to do and can be adapted to any paper you have handy. Take-out menus, old greeting cards, coloring pages, construction paper -- you name it!


Before you clean-up and ditch all the clippings, tinker a few clothespins. These patterned pegs are perfect (say that 3x fast) for hanging mittens, adding tags to gift bags, displaying holiday cards and more!

The best part about using plaids and snowflakes and cable knit is that these decorations can hang around until its time to pull out the spring clothes!

Thank you for reading! Happy December wishes!!!

xo
elyse


Tuesday, November 22, 2016

holiday decorating tips for hipsters

Thank you to Coastal Connecticut Magazine for inviting me to share ideas on how to cozy-up to winter decorating. Find the original article at coastalconnecticut.com


Ah, the holiday season. The fervor, the sweaters, the panic, the joy, the aftermath—and it all moves faster than a high-speed Acela. Oddly enough, once the New Year rolls around, everyone is ready for winter to end but, really, that’s when it gets cranking. Less daylight hours and unpredictable forecasts tend to keep many of us hunkered down at home after dark (that’s 4:30 p.m. to you and me). So, embrace a little hibernation with what we’re calling holiday decorating tips for hipsters. They actually work, and they are pretty hip.

Add Shine
Boost your surroundings with a little sheen. Indulge in a few glitzy objects you might normally shy away from such as a sequined pillow, bejeweled picture frame, or silver plate chargers. Think beyond red, green, and blue when pairing metallic finishes and instead play with updated mixes such as teal with zinc, silver with aqua for icy coastal chic, or be exotic with purple and gold. Other conscious couplings include platinum and pink, tin with evergreen, and copper with apple. Need inspiration? Look at jewelry to see what you like best.

Sweater Weather
‘Tis the season to get cozy, so be sure to have plenty of textures around. Introduce heavier weights and velvety fabrics into the mix in the form of throws and pillows. Even if you’re not a knitter, you can add homespun appeal over a fireplace, radiator, or window by fashioning a quirky swag from mismatched mittens clipped along a length of yarn. Keep toes warm by scattering and layering fluffy area rugs. Spoil yourself with something faux-furry.

Lighten Up
Nothing elicits magic faster than strings of lights. Inexpensive and in a range of colors and sizes, add them wherever you want to infuse a bit of enchantment. No tree? No problem. Drape lights around a mirror or wall art. Suspend them from ceilings using low-tack tape, outline doorways, and use to fill a large glass bowl or vase. Create drama with red lights, add an old-time glow with gold, or get kitschy and use colored bulbs meant for small, sad trees coveted by boys wearing zigzag sweaters indoors.

Red It
Nothing sets a holiday mood faster than some strokes of red. It’s also a color that can change moods faster than a hungry teenager. Some no-fail combinations:
Red + Brown = Log Cabin
Red + Grey = Stylish
Red + Gold = Victorian
Red + Green = Traditional
Red + Green + a Primary Pastel = Modern Retro
Red + Ivory or White = Scandinavian
Red + Orange = Warmth
Red + Powder Blue = Nautical
Red + Purple = Regal

Get Reflective
It’s been said that a room without a mirror is like an outfit without jewelry. And who needs that? Try bringing in mirrors of varying sizes. If you’re commitment-phobic about hanging things, lean mirrors and even layer a few to bring light and movement to any space. Think outside the tree and hang shiny ornaments from drawer pulls. Mirrored disco-ball ornaments are especially fun when positioned near light sources.

Farm-to-Table
Go the utilitarian route while engaging all of your senses with a strategic trip to the farmer’s market. Construct stunning displays using pomegranates, artichokes and cheerful clementine oranges. Fill large bowls with nuts and keep fresh herbs in small vases. Think of cranberries as an embellishment and use them to dot frosted cakes, freeze into ice cubes, or if you have enough patience, string them the old fashioned way with a long needle and thread.

Brown Paper Packages
Bag the tablecloth and unfurl a sheet of packaging or butcher paper to cover tables. Fill sugar bowls with crayons—especially striking in a singular color or range—as part of your winter-long table setting and enjoy some calming doodling. Boxes of crayons in singular colors are now available at some Hallmark stores and online retailers. Likewise, make indoor luminaries by placing electric votive candles inside lunch bags.

Scavenger Hunt
Before it’s time to completely hibernate, take a walk in the woods or along the shoreline to gather natural elements. You’d be surprised at how much fun getting grade-school crafty can be. Spray-paint your finds in a vibrant color followed by a coating of glue and a roll in glitter; shake-off excess and hang from matching ribbon or use to assemble impressive displays. Find a friend who has bittersweet overtaking their backyard and snip some of the gnarly-pretty stuff and display across long, narrow spaces.

Cabin Chic
Whether it’s Tartan or Prince Charles or Prince Edward, plaid conjures casual, rustic appeal. Use a favorite flannel as your guide to selecting rugged colors to bring into your winter design plan. Got a worn shirt too ratty to donate? Chop off the sleeves and cut to fit over empty tin cans, fasten with twine and use to hold cutlery or flowers. Position the body of the shirt to cover a pillow and secure with hook and loop tape, or get snippy and tear strips for use as napkin holders.

Have a Ball
Sometimes the dream of a White Christmas just isn’t meant to be, but don’t let that dash your spirit. Add your own flurry of white by hot-gluing clear fishing line to cotton balls and hanging from inside window sills, or fold white paper doilies in half and suspend over a line of white string to create a simple bunting.

Get Tropical
Have yourself a Caribbean-inspired hibernation and warm up your digs with hot colors. Still go for the luxurious fabrics for pillows and throws, but skip the muted tones and opt instead for vibrant analogous sprinklings of pinks, oranges, yellows, and turquoise. Seek ornaments in this colorway and make paper chains from paper strips of candy dots or decorative paper meant for scrapbooking.

...

happy thanksgiving wishes!

xo
elyse

Sunday, November 13, 2016

how a dollhouse can become your own design board


An open back allows all to peek right in.An open back allows all to peek right in.
Thank you to Romantic Homes for the opportunity to share about the Tinkered Dollhouse with a guest post; you may also view it at the Romantic Homes blog.

Projects that I’ve dog-eared in magazines or “hearted” on Pinterest are sometimes more aspirational in nature than practical due to cost and structural concerns. But then there’s the dollhouse. The wooden folk Victorian discovered curbside one Trash Eve. Once the interior was washed and primed in white, I had a blank canvas on which to experiment with any design vision I pleased.

Armed with my tinkerer’s credo of foregoing notions of perfection, I didn’t concern myself with scale. I also decided from the start that most furnishings would be hand-made using the simplest of tools and supplies. I happily tasked myself with constructing things such as a bed and couch from craft sticks, an easel from toothpicks, a wall clock from a bottle cap, and a chandelier from twist-ties and beads. I also decorated a few unfinished wood pieces, even papering buttons into dishes.


Sit right down and have a little something.Sit right down and have a little something.
While I admire miniaturists who have painstakingly taken on things such as installing floor tiles piece by piece, I went with a trompe l’oeil approach and used print-outs of favorite things as accents. Features such as the white-washed brick wall, bead board, even a patterned rug, are all simply paper. I replaced the yellowed plastic windows with dotted vellum from the scrap-booking aisle, and skipped fixing a broken riser on the spiral staircase as an homage to my own beloved home with its own list of overlooked repairs.

Before starting each room I considered ideas I’d always wanted to try and the dollhouse began to serve as my own three-dimensional design board. A pink wall, a collage wall, a patchwork wall … they’re now all in the dollhouse. Floral-papered stair risers, a fireplace in the bedroom, floral wallpaper! With the dollhouse, I can truly DIM (do it myself). Install white-washed brick in the bedroom? Done.


A queen size bed is the best fit of courseA queen size bed is the best fit of course.
There are a few miniature pieces like the coffee cup with saucer and spoon given to me by my husband as my talk of bringing the dollhouse upstairs from the basement became a regular topic of conversation. The wooden chair in the dining room is mine from childhood – it belonged to a set where a hollow wooden apple in two parts became a table connected by a stem. Small wineglasses are from my youngest son’s enormous collection of Playmobil toys. Charms, ornaments, tiny favors, and other bits and bobs all add up to lovely little sentimental decor.

With the inside pretty much finished, I’m beginning to set my sights on the exterior. I’m perusing houses in Martha’s Vineyard, MA and Cape May, NJ for inspiration. Once again my research is all about the wish list which means there will be window boxes – perhaps made from craft sticks and most likely filled with vintage millinery forget-me-nots – and the dusk blue color will likely be changed to pink or yellow. And just like that, I can change the color of the house.


Essential Tinkering ToolsEssential Tinkering Tools
PS
See how it all began right here.
Thanks for reading!
xo
elyse

Saturday, October 22, 2016

so many steps: the staircase project


I am happy to report that the staircase project is complete! It wasn't quick and it wasn't always easy but it was well worth the time and effort. If you're just tuning in, find the backstory here


Where we last left our heroes ... Once the carpeting was removed, the next step was to paint the dark wood ceiling and upper surrounding walls and facing doors white.The Hubs covered the grey lower walls (that we're leaving alone for now) with sheets of plastic tarp to protect them. Despite watching how-to videos, I found it very difficult and even scary to paint the ceiling -- thankfully my oldest son was up for the challenge and we gave the entire area at least two coats of semi-gloss white interior paint. We let the paint drip, knowing sanding the steps would come next. 


Even though the goal was to just lightly sand away the shine/finish, who knew how much sawdust would be all. over. the. house. even remote areas of far away rooms? We spent hours vacuuming, dusting, washing, etc. Live and learn.


Finally, it was painting day! I purchased an ultra pure white gloss enamel porch and patio floor paint. Feeling victorious after covering two steps, the loaded paint tray somehow slipped out of my hands and bounced and splattered its way comically down to the wood floor, almost in slow-motion. Clean-up on aisle 9. 

Once coated in white, more areas needing repairs became obvious. #TakeOneStepBack 


More hammering, wood putty, sanding and cleaning up; and finally another coat of primer/paint.


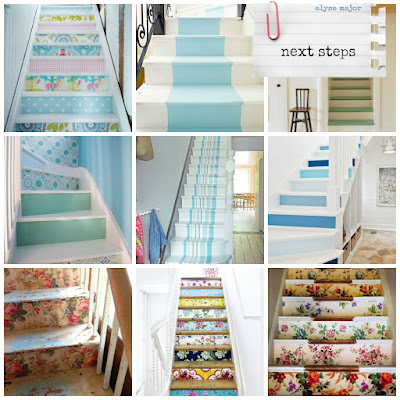
At this point I decided to go with my initial idea of painting a striped runner based on Dash & Albert color combinations.


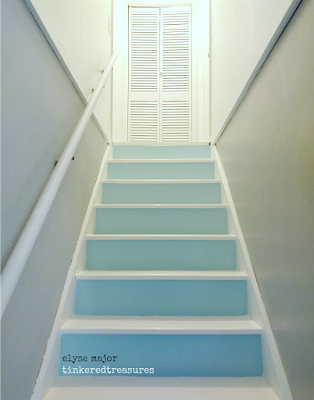
However, even with only a single coat of paint, I began to really like the look of white steps -- so coastal and fresh -- and noticed that the single light fixture overhead lended an ombre effect. That's when I decided on painting all risers a singular color.


I chose a blue similar to a shade seen in the adjacent living room to create a nice flow. Meanwhile outside at the picnic table ... I coated the bi-fold doors and hand rail with two applications of spray paint followed by one-two coats of brushed-on floor paint.


At last it was time to paint the risers! But wait, the steps could use one more coat. #TakeOneStepBack Okay, now we're ready! I first taped the area surrounding each riser with painter's tape {click to enlarge all photos} and then painted two coats of Midwinter Mist by Behr. After giving the paint about :60 to dry, I carefully removed the tape. Using a small paint brush from my art supplies, I carefully touched-up blue smudges with the white floor paint.


I had this blue milk glass knob leftover from my stash of I Modify IKEA supplies.


I really love the results! And am I concerned about scuffs and nicks? I figure it's going to happen but that's what Cottage/Shabby style is all about, right? Embracing imperfections and timeworn objects. And I can always give the steps a fresh coat of white every now and then, just like I do to the windowsills.

Supply List
{Not a sponsored post}
Walls, ceilings, door: Zinsser 1-2-3 Primer followed by Glidden® Essentials™ interior semi-gloss
Steps: BEHR PREMIUM® Porch & Patio Floor Paint - Gloss Enamel in Ultra Pure White
Risers: BEHR MARQUEE Stain-Blocking Paint & Primer Interior Semi-Gloss Enamel in Midwinter Mist
Closet door, hand rail: Rust-Oleum Painter's Touch 2X 12 oz. Flat White General Purpose Spray Paint

Of course one project often leads to another and so I'm off to paint a piece of furniture. Thank you for sticking with this long post!

Happy tinkering!

xo
elyse

Monday, September 5, 2016

first steps: the staircase project


In January of 2012 I blogged about this staircase, featured in my overdue library book Thrifty Chic, and how someday I wanted to try this idea at home. As noted then, this endeavor was at the bottom of the home improvement list for a bunch of reasons, the main one being that my oldest son loves racing down the stairs at lightning speed. Now that he's almost 16, I'm thinking he can take his time or wear no-stick socks, or I can investigate no-slip paint additive.


I painted the bottom half years of the staircase years ago in preparation for Fifi's visit but never got around to finishing the job. Aside from vacuuming, all these years the dark narrow staircase has been fairly neglected and bare. With a high shiplap ceiling, I'll admit, the entire project is a bit daunting.

With the long Labor Day weekend in front of me and a large writing assignment completed, I started to daydream about the staircase again. On Saturday I washed the walls and closet door figuring I'd repaint everything but the steps and leave that for another time.

However by Sunday morning I was ready to start the project as a whole.


The Hubs got on-board big time and pulled up the carpeting, foam and plywood strips revealing years of unidentified stains and even sand (or as we concluded, filtered dirt).


What's better than a friend with a dumpster?! Thank you, Sue!


There's a lot of pulling nails and staples and uncomfortable sitting positions amidst dust and grime so having protective gear such as leather work gloves, goggles and a dust mask are good ideas, as are knee pads or a pillow! It's also beneficial to play music because this is boring work that can take a while.


Half-joking I offered five cents a pulled nail or staple and my oldest son took us up on the offer! He did such a great job, we doubled the rate!

MEANWHILE ... OUTSIDE ...


I hosed-down the wooden bi-fold panel to remove all dust, let dry overnight, and am spray-painting the exterior as a first priming step to reach inside all of the grooves. I'm not concerned with removing or replacing the hinges  -- I don't care for the brass and no one will really see them anyway. #lazy


So, what's next? Mapping out a list and realistic timeline of next steps which will include: filling holes, sanding, washing, priming, and painting everything white! And finally, deciding how I will decorate the blank slate once treated to a much needed freshening.

Chances are good that I'll continue to document step-by-step on my Instagram page so click on over.

Thanks for reading and happiest wishes always!

xo
elyse


Monday, August 1, 2016

selina's seventh: botanical style


getting botanical at the picnic table
I'll never forget sipping tea and signing books with Selina Lake at the Columbia Road Flower Market in East London, England. Perhaps it was on that day, amidst boxes of fresh daffodils and tulips that she was inspired to write her latest book, Botanical Style ... [Insert sound of record scratch here: ] Well, of course not, but how could I resist writing about a once in a lifetime moment like that!?


On that day Selina was on book four or five, and this Spring 2016 release makes lucky seven. I have each of her books and just like their author they are beautiful, approachable and wonderful.


Each time Selina releases a new book I think: this one is my favorite, and Botanical Style is no exception.


Exhibit A: simple yet extraordinary!
I can barely get through a few pages before I'm off to clip or group or hang ...
While her books are all unique, there are common threads, such as unexpected bursts of bold pinks paired with layers of subdued elements; settings that are beautiful and modest; and advice that makes you feel like you're sharing a cuppa while strolling the flower market.


Photos by Rachel Whiting are a visual treat.


Botanical Style, Inspirational decorating with nature, plants and florals by Selina Lake. Ryland Peters & Small is four seasons of pretty inspiration!

Wonder what book number eight will be?

Happy August!

xo
elyse