Sunday, April 26, 2020

let's make little drawers

Hello! I hope that everyone is doing well! The Sunday Let's Make series continues with a project from the Tinkering Archives.


When I first blogged about this tinkering endeavor, I named the project and blog post le petit tiroir – which very roughly translates to the little drawer in Google French.


You will need:
Glue
Embellishments
Scissors
Small matchbox
Paper/fabric scraps
Ribbon, trimming

How to:
While the book outlines a series of five steps {click to enlarge image}, basically you are wrapping the outside cover of a matchbox with paper of fabric. You may also line the inside "drawer" with paper or fabric, and dot the "drawer" front with a flat bead or other embellishment. A large matchbox will also work.


This trio is part of the set created for my first book. I like to tie a piece of vintage seam binding into a bow and tuck something inside, like a sprig of millinery flowers; the top matchbox is adorned with one of my Nana's clip-on earrings.


I love how the matchboxes were styled and even landed the book cover.


Print-out little messages to tuck inside, especially if giving as part of a gift. The little drawers make nice boxes for gifting earrings...


or pretty beads and other tiny presents!

Other paper ideas:
Comic book
Gift wrap
Take-out menu
Magazine page
Map
Scrapbook paper

Happy tinkering + please stay safe at home + well!

xo
elyse

*Looking for copies of my books? Please consider first checking your local independent bookstore or try Barnes & Noble before buying from a big retailer like Amazon. Shop small, buy local.


Sunday, April 19, 2020

let's make bottle cap magnets

Hello! I hope this blog post finds everyone feeling well. Today's project revolves around bottle caps and ideas how to tinker them into something pretty. Don't let the long list of supplies scare you away, this project can be as simple as you want it to be.


You will need:
Bottle caps
Glue
Magnets
Math compass
Paper
Scissors or paper punch
White glitter


In a nutshell {or bottle cap} you want to cut a circle from decorative paper and place into the bottle cap. For a perfect fit, use a math compass.


If using a math compass: Create a fine line and cut out your circle from paper.


If you have this 1-inch scalloped hole punch from Martha Stewart Crafts it creates the perfect insert.


Dab a tiny bit of glue inside the cap before inserting the paper circle to fix in place. If you want to add glitter, swipe some glue over the paper insert, sprinkle glitter on, and then shake off.


And now you have your lovely bottle cap!


Here is how it appeared all styled and photographed in Tinkered Treasures* {page 64}. To turn your bottle cap into a magnet, glue a magnet to the back. Look through your "junk drawer" – chances are good that you have some flimsy free magnet that you can repurpose for this project.

Other ideas
Use to decorate a flat picture frame
Line the flat face of a shelf
Turn into jewelry, perhaps a pin

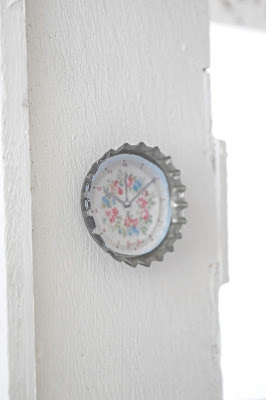
Make a miniature wall clock


Download and print-out or draw a clock face on paper and insert into a bottle cap.


It won't keep time but who cares!

Happy tinkering + please stay safe at home + well!

xo
elyse

*Looking for a copy? Please consider first checking your local independent bookstore or try Barnes & Noble before buying from a big retailer like Amazon. Shop small, buy local.

PS
Follow me on Instagram at elyse.press.major and be sure to click on "chick flix" at my Stories for a giggle!

Sunday, April 12, 2020

let's make napkin holders

Hello! I hope everyone is doing well. Life in quarantine is casual for the most part but I always feel better about myself and life in general when making even the slightest effort toward normalcy. Little acts like wearing earrings, putting on blush, even setting the table. Today, let's make napkin holders, even if they're for paper napkins for dinner on the couch.


You will need:
Images of vintage seed packets
Decorative paper
Thin cardboard
Glue stick
Scissors
Ruler
Pen for making creases
Baker’s twine (or yarn)

Find + print images
Look online for images of vintage seed packets. Here are some that I collected. Just click and download.


Upload into a word processing program and experiment with sizing before printing out.


Build a base
You are essentially constructing the rigid sleeve of a matchbox cover. Determine a standard size (approximately 2.5” x 3.5” shown) and use cardboard that is sturdy yet pliable (think: inserts that come with calendars or pressed shirts, even a cereal or cracker box). The first napkin holder can be tricky so after it's all set you can use it as a template for the others. Sharpen folds with a pen.


Once the base is all set, cover with decorative paper.


Glue the seed packet image to the top cover and trim to fit, if needed.


Complete by tying with a piece of baker’s twine around the box in a bow.


Ready, set, dine
Stuff holder with a napkin and cutlery. Assemble a cheerful table setting using scraps of fabric as napkins, a floral sheet for a table cloth, sprigs of flowers or twigs from outside, mismatched party ware – it all works!


And if fashioning a folded holder isn't your bag, just make a paper loop around the napkin and cutlery and tape together – fast-food restaurant style – but with charm!


This project was developed for the Spring 2015 issue of Cottage Gardener magazine.

Happy tinkering + please stay safe at home + well!

xo
elyse

PS
Follow me on Instagram at elyse.press.major and be sure to click on "chick flix" at my Stories!

Sunday, April 5, 2020

let's decorate jars

Hello! It's been a long time since I've blogged regularly and I hope that you're enjoying these Sunday updates as much as I do creating them. If you're a first time visitor here's a little recap. The past two projects have been made from emptied tin cans (pencil cup, luminary); today I thought we'd venture into jelly jars!


You will need
Jars

My favorite jars for tinkering are from Bonne Maman preserves. I like the short shape, gingham lids, and best of all, their labels easily slide off with a soak in warm soapy water. Of course, any glass jar will do.


Embellishing a jar can be as simple as tying a scrap of ribbon around its base.

You will need
Jar
Ribbon
Scissors

• • •


Embellishing a jar can be as involved as painting the lid and topping it with a circle of paper with a new label to match.* Seal top with decoupage medium.

You will need
Jar
Decoupage medium (Mod Podge)
Foam brush
Glue stick
Paint (craft, spray, leftover house paint)
Paper
Scissors

• • •


This jar simply has a torn piece of fabric glued to the front.

You will need
Jar
Fabric
Glue stick
Scissors

• • •


I use jars in the Girlie Office to display small supplies. For this project, upload a floral fabric image and size to fit a mailing label, add text on top in an unfilled box, and print to create pretty labels**; trim sides with a scallop-edged scissors if you have one handy. Use label scraps to cover the lid.

You will need
Jar
Word processing program
Scallop-edged scissors
Sheet of adhesive mailing labels


Happy tinkering + please stay safe at home + well!

xo
elyse

PS
Show me your projects by tagging #tinkeredtreasures or #tinkereverything on Instagram

Using the book Tinkered Treasures, CICO Books
{search your favorite bookseller or library}:
*Tinkered Treasures - Tinkering Recyclables - Relish Jars, p. 72
**Tinkered Treasures - Getting Started - Making Pretty Paper & Pretty Labels, p. 16

Sunday, March 29, 2020

let's make a tin can luminary

Hello! I hope everyone is hanging in there. I have another project to share today, continuing with the tin can theme since chances are good you have one available. For this series of "let's make" projects, I'm aiming for supplies you already have at home. 


You will need
Hammer
Nail
Paint, brush (optional)
Pencil
Tin Can

Prep
Once again, I like a flip-top soup can for this project but most any medium to large sized will do. Friendly reminder, if you use a can that required opening, be sure to hammer or tamp down sharp points. Make sure the can is clean and dry. I generally peel off labels and run through the dishwasher but a good soak and rinse is just fine.

Draw, Fill + Freeze
Draw a simple shape such as a heart on one or both sides of the can. Fill the empty can almost to the top with water and place in the freezer for a couple of hours – you want the water inside to just-freeze as leaving the can in the freezer for an extended period of time can cause the bottom to expand and warp, making it unsteady as a fixture and we want the base to remain flat.

Channel Your Inner Flintstone
Prepare a sturdy surface (even the floor) where you can hammer a pattern into the can; nesting the can in a thick towel works well. Following the shape you have drawn, gently hammer holes in the pattern, leaving a small space between each, essentially creating a dotted line. Too complicated? Just make random holes, it will still look cool!


Work carefully and quickly to make all the holes before the ice melts. If you plan to hang your luminary, make two holes toward the top of the can on either side so you can attach a handle. When all the hammering is completed, drain and dry the can.

Finishing Touches
Paint the exterior of the can (with heat-safe paint) if you wish but it’s not necessary. If you want to hang your luminary, thread a sturdy piece of wire through and fasten well either by bending or tying. Pro-tip: The handle from a Chinese food take-out carton makes a good hanger!

Ta-da!

Place a votive inside (I prefer battery operated over an actual candle) and enjoy when the sun goes down!

Happy tinkering + please stay safe at home + well!

xo
elyse

Project photo and illustration: Seaside Tinkered Treasures, CICO Books. 
Back story blog post.

PS
Show me your projects by tagging #tinkeredtreasures or #tinkereverything on Instagram

Sunday, March 22, 2020

let's decorate a tin can

Hello! I hope everyone is doing well! No need to read three to four paragraphs before we get started. Let's tinker a can! This is a project that I've been doing for a long time. It's simple and doesn't require many supplies and chances are good that you have an empty can just waiting in your recycling bin. Use your completed project to hold flowers, pencils, and more!


You will need:
Foam paint brush
Glitter
Glue pen
Glue stick
Image on paper
Mod Podge
Paint
Scissors
Tin can
This series is from my archives and is kind of backwards! 
Start at bottom-right, and keep going right until you get to the top-left.

Prep
Progresso soup cans are great for this project because they have flip-top lids which don't leave behind jagged edges. If you do use a can that required opening, be sure to hammer or tamp down sharp points or even cover them over with electrical tape. Make sure the can is clean and dry. I generally peel off labels and run through the dishwasher but a good soak and rinse should do the trick.

Paint
What kind of paint do you have? If you have acrylic craft paint or even leftover house interior paint, apply to the can exterior with a brush. If you're using spray paint, be sure to use outdoors on a still day. No paint? Wrap the can with paper! See Paper Collage variation further below.

Image
I generally download or scan floral fabrics or wallpaper, then enlarge my favorite part, and print out. Next, carefully trim with scissors. Apply glue stick to the back of your cut-out and press on to the can. Seal image with a light coat or two of Mod Podge on a dry foam brush. Allow to dry. No patience for this part? Find a nice sticker.

Embellish
Use a glue pen to draw fine lines where you will sprinkle glitter – one color at a time.


Voila!


That time Matthew Mead photographed a tinkered can


The back cover of Tinkered Treasures


Paper collage variation


Happy tinkering + please stay safe at home + well!

xo
elyse

PS
Show me your projects by tagging #tinkeredtreasures or #tinkereverything on Instagram


Saturday, March 21, 2020

let's make things

Hello!


If this is your first visit, I'm Elyse. I started this blog, initially called "cottage" in August of 2008. At the time, this was the extent of social media for me but I took to blogging quickly as I thought of this space as my own little magazine – a place to share about the craft and DIY home projects I was doing and play at writing in what I called "magazine-ese" style (that succinct writing used in captions). Before long I had this lovely group of online friends near and far. We all found each other somehow, sharing our love for vintage cupcake ballerinas and floral prints. Soon with the encouragement of many, I was selling on Etsy, did a couple of craft fairs, and was submitting tutorial ideas and pitching stories to my favorite magazines. Once I saw my first piece in print – I had the bug, that publishing bug – and it hasn't let up since. Fast-forward, I have written two craft books, co-authored a book of IKEA hacks, have contributed many articles and projects to magazines, even made friends with some of the editors I idolize. Today, I'm the editor-in-chief of a family of Rhode Island magazines. So why all the exposition? I plan to begin blogging again and want to introduce myself. Now, more than ever, I think people want to create things and all of my projects have humble beginnings – a soup can, scraps of paper and fabric, leftover paint. Starting soon I will blog easy step-by-step projects. This isn't a fancy website, I'm not doing YouTube videos, I don't have any sponsors. It's just me, paper, scissors, and glue, hoping to share some creativity and beauty for your little corner of the world.

xo
elyse

Tuesday, December 31, 2019

looking ahead

New Year's Eve is the perfect time to be reflective, right? I was sitting on the couch watching a live broadcast of fireworks in Boston, it had just turned 7pm and the station cut-in to also show London, where the clock just struck midnight. Happy New Year! I decided it would be fun to join the online conversation and post something to Instagram but didn't really have anything new to share from my phone's gallery (and the light is too dim to snap any pics) so I revisited the archives of my barely functioning home computer.


I found this photo and it kind of stopped me in my tracks. Created in 2011 around the height of my being active on this blog and working tirelessly to build a portfolio of published writing and craft tutorials to support a book proposal. In 2013 my first book Tinkered Treasures was published by CICO Books, followed in 2014 by Seaside Tinkered Treasures, and a few years later came "the IKEA book" in various versions by different publishers. All the while I continued to write home features for shelter magazines. It was a busy time of making and writing and writing about making. So much has happened to me professionally since I wrapped some pencils in photocopies of fabric, topped them with paper roses, and snapped some pics.

I think of the past year and realize I didn't tinker very much with paper and glue. I did spend a lot of time writing, which is a great thing. I also realized that I'm not sharing about making as much and decided to rename my Instagram account to reflect that I'm instead posting more about my life and work and the things I find beautiful – and so with Elyse Major already taken – you can find me on Instagram now at elyse.press.major  It felt strange letting go of my "brand name" but it also seems like a good move forward. The account is still Tinkered Treasures on Facebook. Baby steps, right?

Wishing everyone a happy and healthy year ahead! Thank you for reading!

xo
Elyse